Posts
The Harness Is the Product: What Cloudflare's Vulnerability Harness Teaches AppSec Teams
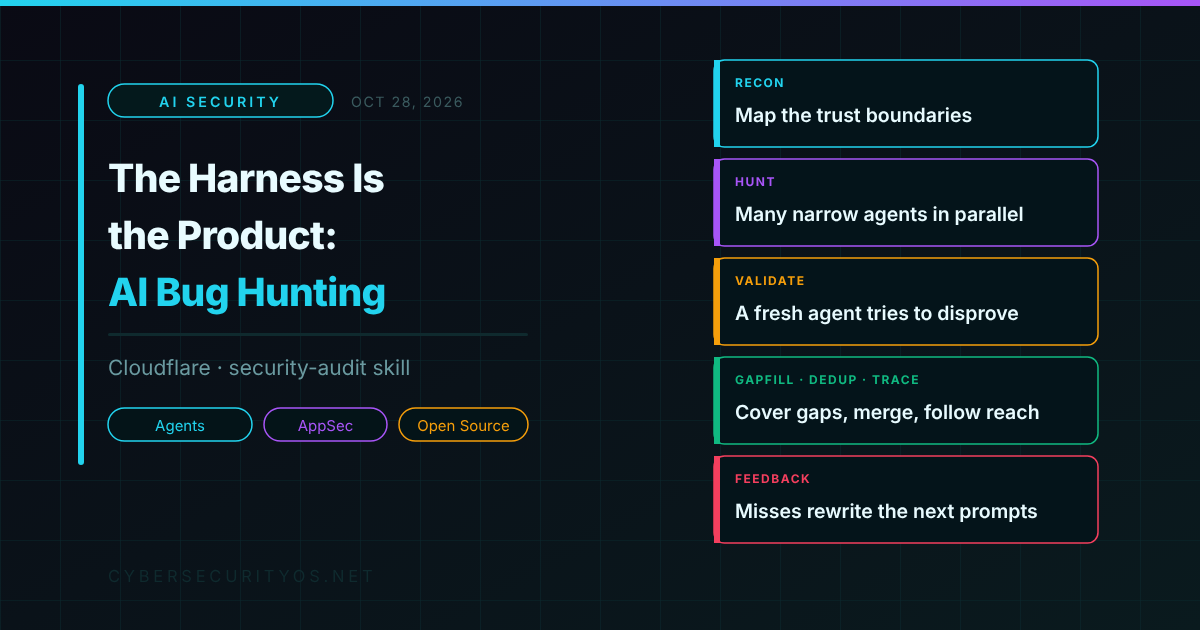
Most of the conversation about AI and vulnerability research is about models. Which one found the most bugs, which one is gated, which one just topped a benchmark. Cloudflare’s security team spent a long post on June 18, 2026 arguing that’s the wrong thing to focus on. In Build your own vulnerability harness, the point is simple: “Our approach centers on the harness, not the model.”
Then they did something more useful than writing about it. They open-sourced the skill the harness grew out of as cloudflare/security-audit-skill, MIT-licensed, installable in one command. This post covers both: how the harness is structured, what you actually get in the repo, and how I’d put it to work.
Why one agent scanning a repo doesn’t work
If you’ve pointed a coding agent at a codebase and asked it to “find security bugs,” you’ve seen the failure modes. It reads a few files, finds something that looks bad, writes a confident paragraph, and stops. Ask again and you get a different list. Half of it is a checklist deviation with no real attacker path. The other half you can’t tell without an afternoon of tracing.
Cloudflare started in the same place: a roughly 450-line security-audit skill run against a single repository, tuned until it surfaced real bugs. Two problems pushed them past it. First, long sessions run out of context, and the model loses track of what it already found. Second, a single-repo session misses the relationships between a service and the applications that consume it, which is often where the real bug lives.
The fix wasn’t a better prompt. It was splitting the work into stages, giving each stage one job, and keeping state somewhere other than the model’s context window.
The pipeline, stage by stage
Here’s the harness as Cloudflare describes it. After recon, the stages run as a continuous producer-consumer loop rather than a one-shot sequence.
| Stage | What it does |
|---|---|
| Recon | Three parallel sub-agents read the codebase and write an architecture.md: trust boundaries, entry points, likely attack surface |
| Hunt | Around 50 agents search for bugs concurrently, each scoped to an area and attack class |
| Validate | Independent agents try to disprove each finding |
| Gapfill | Enqueues fresh hunt tasks for any (area × attack-class) cell that still looks under-tested |
| Dedup | Collapses findings that share a root cause into one record |
| Trace | Walks the dependency graph and adds hunt tasks inside every consumer repo that uses the affected code |
| Feedback | Takes validation failures, shallow runs, and repeated misses, and rewrites the queued prompts |
A few details are worth calling out.
Hunters can spawn sibling agents when a task turns out to be bigger than expected. Cloudflare says those siblings handle between 9% and 20% of fleet-wide tasks, depending on the model. That’s a useful number. It tells you how often a fixed task breakdown gets it wrong, and why the harness needs to adjust itself instead of relying on a perfect plan up front.
Trace is the stage most teams won’t think to build. A bug in a shared library isn’t one finding. It’s a finding in every service that calls the vulnerable path with attacker-controlled input. Walking the dependency graph turns “this function is unsafe” into “these five services are exposed,” which is the version your engineering leads will act on.
Feedback is what makes it a system rather than a script. When validators keep rejecting a class of finding, or hunters keep coming back shallow in one area, the harness changes its own prompts for the next round. That’s the same loop a good AppSec team runs by hand after every pen test.
Three design decisions worth stealing
You don’t need Cloudflare’s scale for these. They apply to any team putting agents into a security workflow.
1. Keep state out of the model
Cloudflare treats each agent as a stateless compute engine. Shared state (tasks, findings, coverage) lives in SQLite, and each agent’s context is kept under 25% of the model’s window. The agent gets a narrow task, reads what it needs, writes a structured result, and exits.
This is the single biggest difference between a harness and a long chat session. Context windows are big but not reliable at the edges. If the only record of what’s been covered is the model’s memory, you have no idea what’s been covered.
2. The finder never grades its own work
Every candidate goes to a fresh agent whose job is to break it. Cloudflare also recommends using a different model for validation than for discovery, so you’re not cross-checking a model against its own blind spots. The open-source skill puts it plainly: “the agent that checks a finding is never the one that found it.”
If you take one idea from this post, take this one. Without an adversarial validator, 50 hunting agents just give you 50 times as many plausible false positives. And according to Cloudflare, every bug the pipeline surfaced came with a working test case. That’s the bar that gets a finding past an engineer’s skepticism.
3. Design for the next model, not this one
The post is explicit: design it to be model-agnostic from day one. Cloudflare runs the harness with “whatever frontier model is currently best at what we need,” and warns that its specific numbers are out of date by the time you read them.
That matches what we saw when Anthropic split the frontier into Fable 5 and Mythos 5. The best model for this work changes every few months, and access to it may be gated. Your stages, your ledger, your validation rules, and your history of confirmed findings carry over from one model to the next. That’s the part to invest in.
What’s actually in the open-source skill
Be clear on expectations. The repo is the single-repo starting point, not the production fleet system. There’s no cross-repo Trace stage and no 50-agent queue. What you get is the core discipline, packaged so a coding agent can follow it.
Install and run
It needs a coding agent with a model that supports tool use and parallel sub-agents, plus Node.js for the validators.
npx skills add https://github.com/cloudflare/security-audit-skill \
  --skill security-audit

# or, for a user-level install
npx skills add https://github.com/cloudflare/security-audit-skill \
  --skill security-audit \
  --global
Then start the agent in the target repo and ask for an audit:
security audit this codebasefind security vulnerabilities in ./srcdo a security review, output to ~/audits/my-project
There are two modes. Guidance mode is the default for questions, focused reviews, and triage. It doesn’t write artifacts. Full audit mode runs when you explicitly ask for a codebase audit, a pen test, or report artifacts. Output lands in ~/security-audit-skill/<repo-name>/run-<N> by default, outside the target repo. It will only write inside the repo if you pick a directory that version control ignores.
The six phases
| Phase | Output |
|---|---|
| 1. Reconnaissance | architecture.md, coverage-ledger.json |
| 2. Coverage-led hunting | Structured candidates from isolated hunters, checked by coverage critics |
| 3. Candidate validation | A fresh verifier tries to disprove each unique candidate |
| 4. Structured output | findings.json, validated against report-schema.json |
| 5. Independent record verification | Fresh agents re-check the final source claims |
| 6. Target-neutral reporting | REPORT.md, FINDINGS-DETAIL.md, NEEDS-VALIDATION.md |
Two zero-dependency validators, validate-coverage-ledger.cjs and validate-findings.cjs, run after the ledger changes and after final records are written. A run either ends with every artifact written and both validators passing, or it ends with run_status: "incomplete" and a stated reason. It doesn’t quietly hand you a half-finished report.
Attack-class guidance is split into files the agent loads only when they fit the target: memory safety and binaries, AI and LLM targets, web protocols and auth, client-side, supply chain and release, cloud and deployment, RPC and messaging, resource exhaustion, data isolation, and desktop, mobile, and local IPC.
Three verdicts, and only one gets a severity
confirmedrequires a complete source trace and a bounded, observed result. Only confirmed findings get a severity.needs_validationnames the exact fact that’s still unresolved, such as a deployment control that isn’t visible in the repo. No severity.rejectedrecords a disproved candidate so the next run doesn’t chase it again.
That middle category is the honest one. Most AI tools force every lead into either “vulnerability” or “nothing.” needs_validation says “here is a real hypothesis, and here is exactly what a human needs to check,” which is what a good reviewer would tell you anyway.
Profiles, budgets, and repeat runs
There are three profiles: quick (one hunter wave, one critic pass), standard, and deep (per-subsystem splitting, critic waves until clean, and a second pass on covered units). Profiles change how wide the search goes, not the evidence bar.
You can cap agent invocations with a budget. Validation reserves are set aside before hunting starts, so the run never spends everything finding bugs and has nothing left to check them.
And plan on more than one run. The README says that in Cloudflare’s tests, a single run found roughly half of what repeated runs found in total. Runs build on each other: the next one reads the prior ledger and findings, goes after the gaps, and revalidates anything whose source has changed.
The safety rules are the most underrated part
An agent that builds, tests, and fuzzes your code is running untrusted code. If the repo is hostile, or just has a test that calls production, that’s your problem.
The skill takes this seriously. Source inspection is read-only. Target-controlled builds, tests, browsers, emulators, and fuzzers only run inside an OS-enforced sandbox with no external network, an empty allowlisted environment, a read-only target, writes limited to a scratch/ directory, and hard resource limits. If the sandbox can’t enforce all of that, the target code doesn’t run, and the lead stays needs_validation. It also uses dummy principals and secrets, never probes live or shared systems, and doesn’t install dependencies.
This is the same principle I covered in the NIST, NSA, and CISA guidance on agent incidents: assume the agent will find your misconfigurations, and build the containment first. A security tool that ignores its own blast radius isn’t a security tool.
A definition of a good finding
The skill’s anti-pattern list reads like a style guide for every pen test report I wish I’d received. Among the ten:
- Checklist deviations presented as vulnerabilities
- Defense-in-depth advice with no reachable boundary violation
- Guessing deployment behavior that isn’t in the repo
- Treating a principal’s intended authority as a violation
- Overstating effects
- Assigning severity to something that isn’t confirmed
- Writing the report before verification
Two principles sit behind it. Severity requires impact: severity is likelihood times impact, not distance from a best-practice checklist. And defense-in-depth gaps are not vulnerabilities: if one layer already stops the attack, a missing second layer is a hardening note.
Every confirmed finding has to name the lower-trust principal, the input or action, the control that should have stopped it, the boundary it crossed, the affected party, and the observable result. If your current SAST tool or AI reviewer can’t fill in all six, that’s a big part of why your developers have stopped reading its output.
How I’d roll this out
If you run an AppSec program, here’s how I’d start this quarter.
- Pick a repo with history. Choose a service where you already know about a few past vulnerabilities from pen tests, bug bounty, or incidents. Run the skill on a commit from before those fixes. Now you can measure recall instead of guessing.
- Build the sandbox first. Without it, every lead that needs execution comes back
needs_validation. That’s safe, but you lose most of the value. - Run it three times. Track how many new confirmed findings each run adds. That curve tells you how many runs a repo of that size actually needs.
- Route
needs_validationto owners, not to the backlog. Each one is a specific question about deployment or config. Service owners can answer it in minutes. In a ticket queue it’ll sit for months. - Validate with a different model family. If your agent supports it, use one provider for hunting and another for validation and record verification.
- Feed it into your existing program. Confirmed findings should go through the same intake, SLAs, and metrics as everything else in your vulnerability management program. Don’t create a separate “AI findings” queue nobody owns.
- Measure what matters. Confirmed rate, rejected rate, duplicate rate, and time from finding to fix. If the confirmed rate is low, fix the recon and attack-class scoping before you add more hunters.
A threat model helps here too. The recon phase is essentially an automated version of the trust-boundary map from threat modeling in plain English. If you already have one, compare it with the generated architecture.md. Where they disagree is worth a conversation.
What to watch out for
- It’s the seed, not the fleet. No cross-repo trace, no continuous queue, no feedback loop rewriting prompts across thousands of tasks. You’ll have to build those if you want them.
- Cost scales with coverage. Parallel sub-agents, multiple runs, and independent verification all cost tokens. Set a budget and look at cost per confirmed finding, not cost per run.
- Your source goes to a model provider. Make sure the agent and model you use are approved for the code you’re auditing. That’s a data-handling decision, not just a tooling one.
- It finds and explains. It doesn’t fix. The skill names the smallest effective fix but never modifies target source. Remediation is still your engineers’ job, which is the right call.
- Only audit what you own or are authorized to test. The skill is built defensively. Using it on someone else’s code without permission is still a legal and ethical problem.
Every team will have access to strong models. What separates the teams that get real bugs from the ones drowning in plausible noise is the structure around the model: narrow tasks, state outside the context window, a validator whose job is to say no, and an evidence bar that doesn’t move. Cloudflare has published both the design and a working starting point. The cheapest experiment in AppSec this year is to install it, run it three times against a repo you know well, and compare the results with your last pen test.
Sources: Build your own vulnerability harness, Cloudflare (June 18, 2026) | cloudflare/security-audit-skill, GitHub (MIT license)